Room layout for Small bedroom
 For some time now, I’ve wanted to give you a peek at Indiesew HQ and where I spend my time sewing, blogging and writing emails. But I've always found a reason to delay it. For starters, Indiesew HQ's location has shifted between two different houses and an apartment. And then the aesthetics were never quite right. Those shelves weren’t hung, that filing cabinet wasn’t painted, or my ironing board cover needed a wash.
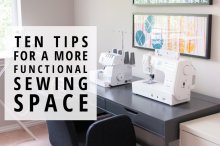
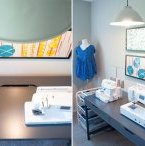
But the other day, I couldn’t help but think about how much I love my most recent sewing space. I enjoy the hours I spend here and the creative energy it gives me. So, despite its flaws, today I’m showing you where I sew, where I fulfill your orders, and where I photograph and write our blog posts.
It’s a small bedroom, only 12.5' by 9.5', on the second floor of my dated early-90’s rental house. But I love it. And that’s because I’ve finally figured out what my ideal sewing space needs. If your sewing space feels a bit "meh", this post might be useful for you. I've found that these tips have completely transformed the hours I spend at my sewing machine.
 1. Decide on Boundaries
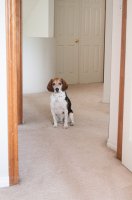
I don’t have kids, but I do have two somewhat needy dogs. Working from home all day means that our lab, in particular, tends to follow me from room to room. As soon as we moved into this house, I made it an absolute, no-exceptions rule that dogs were not allowed in my sewing room. The hard task of kicking them out of my space has been a game changer. I love their company, but now there’s zero dog hair to deal with. I’m not tripping over sleeping dogs right in the middle of the floor. And honestly, I’m less distracted.
When I was a kid, my mom sewed up a fabric playhouse (draped over a card table) that we played in while she sewed. It kept us busy, and away from her sharp fabric scissors and pointy pins. If you have kids, think about giving them a dedicated space to play while you sew. Tell everyone in the house that fabric scissors and rotary blades are off-limits.
 Keeping pets and kids out of your space also creates a space that’s entirely yours. I may be singing a different tune once I have kids, but for now I love that I don’t have to share my creative space with anyone else.
2. Play with the Layout
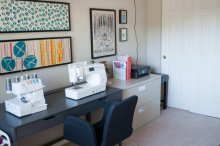
No matter where you sew, it’s a good idea to experiment with where you place your essential tools to be most productive. I never expected the placement of my sewing desk, ironing board, and cutting table to affect how much I enjoy my time sewing. But if it’s important for chefs working in the kitchen, it’s important for sewists too!
Every sewist's hobby looks a bit different. For me, if I can reach my ironing board and cutting table without getting out of my rolling chair, I’m a happy camper. Constantly getting up because I forgot my thread snips or pins on the ironing board is my pet peeve. The upside of sewing in a tight space is that this isn’t hard to achieve.
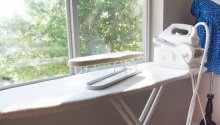
My new favorite place for the ironing board? In front of a big window. During hot summer days when my iron heats up the room, the breeze from the window cools things down. Plus, it's fun to have something interesting to look at while pressing seams and hems.
If you’re in your dining room or kitchen, consider some storage options in that room for your sewing machine and supplies. A small bench with internal storage works great for keeping everything out of the way.
3. Install Adequate Lighting
In our current place, there are no overhead lights in any of the bedrooms. When we moved in, I immediately knew that we’d have to install some serious ad-hoc lighting so I can see what I’m doing when I sew.
In my studio I sew with a simple overhead light from Ikea that plugs into the wall outlet. It illuminates the area over my sewing machine and serger. I also have a floor lamp that illuminates the area by my cutting table and ironing board so that I can see when I’m pressing or pinning seams.
Even if you have to drag a few floor and desk lamps into your space while you work, your eyes will appreciate the help.
4. Get Organized
Being creative doesn’t always jive with being organized. When inspiration hits, I often find an aftermath of fabric, thread and notions strewn around my sewing space. But there are a few ways to be organized that will make storing and accessing your sewing supplies so much easier.
Source a few organizers to store your threads, scissors, fabric markers and other necessities. I thrifted a small metal organizer and it works great for holding the supplies I access on the regular.
5. Have the Essentials Handy
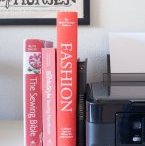
Along with achieving a functional layout, it’s important to keep your most-used tools an arm's reach away. I find I’m constantly using my pressing tools and rulers, so those live in a small metal box on a shelf within easy reach.
The same goes for the sewing books that I reference again and again. The Sewing Bible has been well loved and it covers most sewing techniques that I often forget (blind hems, mitered corners, etc). I keep these next to my printer so I don’t have to go searching for them when I need a quick answer.


Related posts:
 This cozied-up formal dining room is wonderful for those who have a large family or group of friends and often find themselves throwing dinner parties or hosting…
 Living in condominiums has become a trend in the Philippines due to the numerous advantages they offer. But some think moving in a condominium unit may mean swapping…
 Whether your home style is classic or contemporary, refresh your home on a budget with the Big Lots furniture department! Blend furniture styles to create a unique…
 Landscape designers agree that the best way to create a unique and functional backyard patio is to design the patio in separate areas. Rather than placing one large…
 Product Recycling Fund The price of this item includes a contribution to a Product recycling fund to ensure that waste electrical and electronic equipment is collected…